Seller Application
We’d love to have you as a seller on the DJAWN platform!
First things first…you need to apply as a seller. Do this by clicking on the “Click here to become a DJAWN seller today!” banner on the homepage.

Fill in your store information. Don’t forget to add a store logo.

Then tell us a little about your selling history.

Tell us what kinds of cards you plan on selling.

Then tell us your default shipping options. You’ll be able to update your defaults later and you can always change them for a particular event.

Finally, read and accept the terms and click Submit to submit your application.

We attempt to respond to all applications within one business day but it could take longer.
Setting Up Your Stripe Account
DJAWN does not store bank account information. Instead, we use Stripe, an industry-leading payment processing company, for payment processing. To learn more about Stripe, click here.
Setting up a Stripe account will allow you to receive payments.
Click “Please click here to proceed” to start the Stripe account setup process.

Enter your mobile phone number and email address.

Choose your type of business.

Enter your personal details. (DJAWN does not receive or store this information.)


Add your business details. If you don’t have a website, just use www.djawn.com.

Enter your banking information.
Reminder: DJAWN does not receive or store this information. Please see the Stripe website for more details about how they protect your information.

Review your information and click Submit.

Types of Events
Breaks With Randomized Slots/Tiers
Pick Your Slots
Rip & Ship
Plan An Event
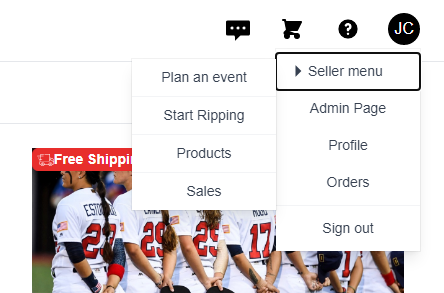
To plan an event, click on your profile initials, then Seller menu, and then Plan an event.
Planning A Rip & Ship
Before you start, be sure that you have loaded your products and applied the correct prices. These prices cannot be changed during a Rip & Ship!
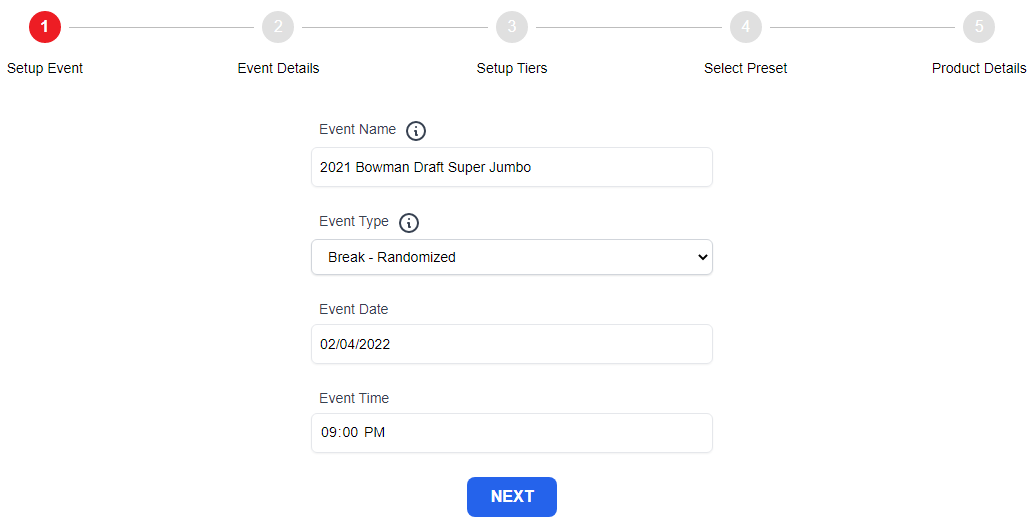
Setup Your Event
Don’t worry, you can change this part later.
- Enter a descriptive Event Name for your Rip & Ship.
- Choose an Event Type of Rip & Ship
- Choose an Event Date
- Enter an Event Time
- Click Next
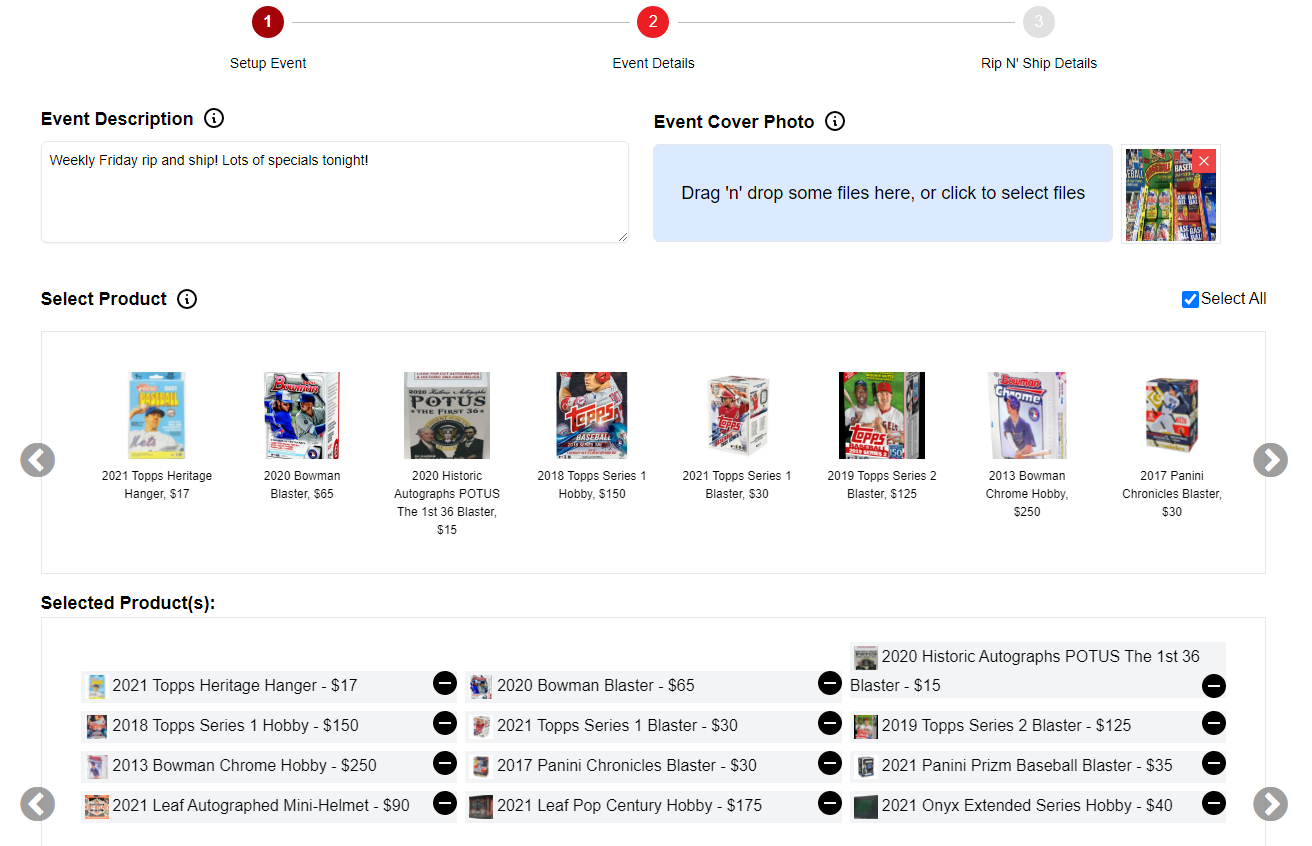
Enter your Event Details
- Enter a meaningful description that will give your potential customers an overview of your Rip & Ship.
- Upload an Event Cover Photo. This can be something specific, such as a photo of the cards you’ll be ripping, or something general, such as your store logo.
- Choose the Products you wish to offer during your Rip & Ship.
Your list of products to select will contain every product in your inventory which is:
- Set to Active status
- Has a Quantity (minus Reserved) greater than 0
Note – these products must be added to your inventory prior to planning the event.
You can select your available products one by one by clicking on each one, moving it to the Selected Products list. You can also include all of your available products by choosing Select All.
You may remove products from the Selected Products by clicking the minus sign beside the selected product.
- Click Next
Enter Your Shipping Options
- Choose your Shipping Type
- Choose whether you will ship all cards or just the hits
- Enter your shipping frequency
- Click Create

Your Rip & Ship event has now been planned!
Start Ripping
DJAWN recommends you plan your events. This gives your customers advance notice of when you will be live. Plus, you can pick and choose which items you wish to include during your event.
However, you always have the option to just start ripping! This will start up a new rip & ship event and include all of your available inventory.
Planning A Randomized Break
DJAWN gives you a lot of flexibility when setting up your breaks. The system has several pre-defined break templates, but you have the ability to create your own as well.
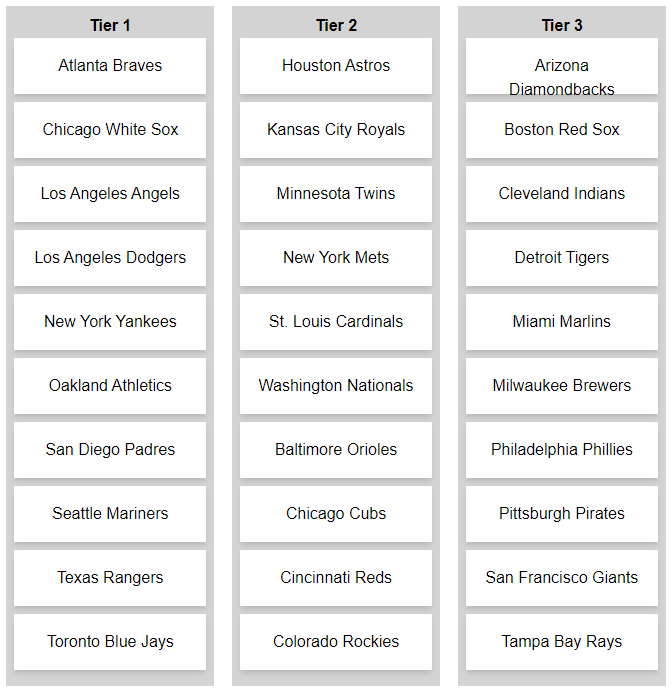
Tiers allow each slot to receive multiple teams, divisions, players, etc. Breaks may have multiple tiers so that collectors get multiple entities per slot.
For example, in the 3-tier break on the right, each slot is guaranteed one team from tier 1, one team from tier 2, and one team from tier 3.
Before you start, be sure that you have loaded your products.
Setup Your Event
- Enter a descriptive Event Name for your Break.
- Choose an Event Type of Break – Randomized.
Choosing A Template
DJAWN provides several templates for your use. You also have the ability to create and reuse your own template.
Click on a template to select it.

A quick preview of the template will be presented so you can confirm your selection.
Click Close and then either choose another template or click Next.

Edit Template
Review the template.
You can click and drag any of the slots to change the order or to move them to a different tier.
Once done, click Next.
If you have made changes to the template, you’ll be prompted to provide a name for your new template. This new template will now be available to you for future use.

Price Your Slots
Since you have chosen a randomized break, each slot will have the same price.
Enter the Cost per slot.
Notice that the Total Break Cost will be calculated for you by multiplying the Number of slots by the Cost per slot. Use this as an opportunity to verify your price.
Click Next.

Choose Your Break Items
- Enter a Description for your break. Important – This should contain any details about your break, including what products will be ripped.
- Upload an Event Cover Photo. This can be something specific, such as a photo of the cards you’ll be breaking, or something general, such as your store logo.
- Choose the Products you will be including in your break.
- Click Create.
Your list of products to select will contain every product in your inventory which:
- Has a status of Active.
- Has a Quantity (minus Reserved) greater than 0
Note – these products must be added to your inventory prior to planning the event.
You can select your available products one by one by clicking on each one, moving it to the Selected Products list. You can also include all of your available products by choosing Select All.
You may remove products from the Selected Products by clicking the minus sign beside the selected product.

Your randomized break has been setup!
Randomization
Randomization will automatically occur immediately once the last available slot has been sold. The randomized results can be viewed by clicking on the event and then expanding the Randomized Results section once inside the event detail.

Planning a PYT Break
DJAWN gives you a lot of flexibility when setting up your breaks. The system has several pre-defined break templates, but you have the ability to create your own as well.
Before you start, be sure that you have loaded your products.
Setup Your Event
- Enter a descriptive Event Name for your Break.
- Choose an Event Type of Break – Pick Your Slots.

Choosing A Template
DJAWN provides several templates for your use. You also have the ability to create and reuse your own template.
Click on a template to select it.
A quick preview of the template will be presented so you can confirm your selection.
Click Close and then either choose another template or click Next.
Edit Template
- Review the template.
- Add a price for each slot.
- Once done, click Next.
You can click and drag any of the slots to change the order.
If you have made changes to the template, you’ll be prompted to provide a name for your new template. This new template will now be available to you for future use.
Notice that the Total Cost, the sum of the cost of all slots, will be calculated for you. Use this as an opportunity to verify your price.

Choose Your Break Items
- Enter a Description for your break. Important – This should contain any details about your break, including what products will be ripped.
- Upload an Event Cover Photo. This can be something specific, such as a photo of the cards you’ll be breaking, or something general, such as your store logo.
- Choose the Products you will be including in your break.
- Click Create.
Your list of products to select will contain every product in your inventory which:
- Has a status of Active.
- Has a Quantity (minus Reserved) greater than 0
Note – these products must be added to your inventory prior to planning the event.
You can select your available products one by one by clicking on each one, moving it to the Selected Products list. You can also include all of your available products by choosing Select All.
You may remove products from the Selected Products by clicking the minus sign beside the selected product.
Your PYT break has been setup!
Modifying A Planned Event
Changing Your Event Name or Date/Time
From within an event, click on the icon beside the Event Name or the Event Date. After making the change, click the checkbox to save it.
Changing Your Event Image
From within an event, click on the red hamburger menu and choose Change Picture.

Canceling An Event
From within an event, click on the red hamburger menu and choose Cancel Event.
You have the option to then confirm your choice.
Note – there is no way to undo this!


Starting Your Event
Before You Start
In addition to the typical items such as cards, sleeves, and top loaders, there are other things you’ll need to consider prior to starting your live event.
Prerequisites
- Setup your event on the DJAWN site
- Choose a device with a camera and microphone to stream your event
- It is recommended you have access to a second device (desktop, tablet, phone, etc)
Important – If you are using a phone to stream your event, it is very important to have access to a second device (desktop, tablet, phone, etc) so that you can view comments and manage your event.
Start the Event
To start your event, navigate to it from the DJAWN homepage.
Click on the hamburger icon to see the seller menu.
Click Start Live Event.
Click Enter Room to start the event.
Note that every event on DJAWN is recorded so be sure you’re ready to start recording before clicking Enter Room.

Running A Rip & Ship
Once your event has started, buyers will be able to enter your room.
Managing Your Line
The Active Line view allows you to see who is in line, who has paid, and what they have paid for.
In the example on the right, you can see that Spooner St is currently at the front of the line. The dollar sign icon indicates they have already paid.
Note that a buyer won’t be able to move to the front of the line if they have not yet paid unless there are no other buyers who have already checked out. Buyers who are in line but have not yet checked out can only get as high as 2nd in line unless no other buyers have checked out yet.
The seller can rearrange the line of buyers by clicking on the buyer’s name and dragging it to any spot in the line.

Show What a Buyer Purchased
Clicking on the dollar sign icon allows you to see what the buyer has purchased.

Move to the Next Buyer
Once a buyer’s turn has ended, you can move on to the next buyer by clicking the End Turn button on the top right.

Removing Buyers From Line
You may remove a buyer from the line by opening the seller menu and then choosing a user and clicking Remove Buyer From Line.


Closing Your Line
It is recommended that you always close your line when you have decided to end your event. This prevents users from buying products and getting in line.
To close the line, click on the seller menu and then click Close Line.
You can also open the line again if you wish by following the same steps.


Running a Break
Breaks are very straightforward in that purchases have all been made ahead of time. See above to start your break and see below to end it.
Who Has What?
Sellers may see which buyer has which slot via the Slots/Teams view.

Linking Events
Linking Breaks To Rip & Ships
DJAWN has unique functionality which allows sellers to conduct breaks within rip & ships. This is done by “linking” the breaks to the rip & ship. This can be done both prior to starting the rip & ship and during a live event.
Breaks which are linked to a rip & ship can be purchased during the rip event. Once the break fills, it will automatically be added to the seller’s queue.
If a linked break does not fill prior to ending the linked rip event, the break will be unlinked and remain a planned break.
Linking Breaks Prior To Going Live
Navigate to your rip & ship event and click on the hamburger menu to open the Event Details Menu.
Choose Link Event.

Select one or more breaks to link to this event.
Click Save.

To unlink a break, click the hamburger menu, choose Link Event, unselect any breaks you wish to unlink, and then click Save.

Linking Breaks During A Live Event
Often times, sellers decide to create breaks on the fly during a rip event. This is easy to do on DJAWN!
Once you’ve started your rip event, open the Linked Events view. Here you will see a listing of all events which are already linked to this rip.
Click on the Link Event button to link (or unlink) a break.

Choose which break(s) to link to this rip event and then click Save.
The newly linked break(s) will now appear in your listing.

Linking Breaks To Breaks
This feature allows a breaker to seamlessly navigate from one break to another without requiring buyers to exit the current break and join the next one.
Link the breaks the same way as you link a break to a rip & ship.
Mic Requests
Sellers can share the mic with buyers so that they can show their excitement as their cards are ripped!
Approve / Reject
When a buyer requests the mic, sellers will see a chat message providing the ability to Approve or Decline the request.
Once approved, the buyer must still confirm before their mic is activated.

Viewing / Managing Requests
Sellers can view raised hands via the Attendees screen.

Buyers with an active mic will have a microphone icon beside their name on the Attendees screen.

Sellers can also Approve / Decline mic requests via the Seller Actions screen by clicking the Actions hamburger menu.

Once activated, sellers can mute or close the buyer’s mic via the Seller Actions screen.

Ending Your Event
Important – Be very careful when deciding to end an event as this action cannot be undone.
To end your event, click the seller menu and then click End Event.

Products
Products is where you manage your inventory. Use this screen if you’re adding or updating a handful of products. If you’re loading more than a few products, we recommend using the import function. See below for help with this.

Importing Products
The import tool is useful if you’re adding or updating more than a few products. In general, there is a csv template you can use to enter all of your products and then import it into the DJAWN platform.
Step 1 – Click here to download the import template.
Step 2 – Open the file using Excel and enter all of the applicable information, one row per product.
Step 3 – Review the spreadsheet.
- Verify the file format is saved as a csv
- Ensure the file is not empty and follows the requirements listed below.
- Do not change the format of the file. For example, do not add or delete columns.
- Do not exceed 100 products in a single file. If you have more than 100 products then upload a separate spreadsheet.
- The Product Name is used as the unique identifier. This means that you should not add an item with the same name as one that exists already.
Step 4 – Import the updated template.
From homepage, click on your profile on the right top of the page and then click Products.

Click the “Import” button. Note that the “Import” button will not be visible until you have at least one product listed.

A popup will be displayed. Upload your csv file by clicking the “Add file” button or by dragging and dropping your file.

The system will validate your file. If your file passes the validation, you will receive a message showing a summary of your import. At that point, click “Import products” to complete the import.
If you receive a validation error, correct the spreadsheet and restart the import process.

Once the import has completed, check the list of the products to ensure your products have been created successfully.

Products uploaded via the import process will default to a Draft status. Please edit each product and add a photo of that product to help your customers see what they’re buying. Don’t forget to set the status as Active.

CSV FILE FORMAT
Header Row
The first row of your CSV file must include the column headers. We recommend you use Excel to edit your files. However, if using a text editor such as Notepad then each column must be separated by a comma.
Product Rows
All rows after the first row should contain data for your products, one row per product.
The following table provides requirements and details on each column:
| Column name | Description | Mandatory | Data requirement |
| ProductName | Unique name of your product | Yes | 60 characters limit |
| ProductDescription | Description of your product | Yes | 30 character limit |
| AvailableStock | The quantity of available units of this product | Yes | Whole numbers only and must be greater than 0 |
| Sku | Stock-keeping unit (SKU) for your product | No | Leave blank if you don’t plan on using skus |
| Barcode | Barcode of your product | No | Leave blank if you don’t plan on using barcodes |
| UnitCost | The price you paid for each unit of this product | Yes | Whole numbers only |
| RipNShipSellPrice | The price of a single unit of this item if purchased during a Rip & Ship event | Yes | Whole numbers only and must be greater than 0 |
| StoreSellPrice | The price of a single unit of this item if purchased outside of a live Rip & Ship event | Yes | Whole numbers only and must be greater than 0 |
| Tags | Tags allow your items to be searched for more easily. | No | Free text. You may add as many tags as you like, each separated by a pipe (“|”). |
OBS
OBS is a popular, free, and open source software for video recording and live streaming. Many livestreamers use OBS to customize their live event.
DJAWN.COM supports OBS, but you must follow the following steps to add OBS to your livestream:
- Shutdown OBS if it is running
- Start your livestream on DJAWN.COM
- Click the gear icon
- Change the camera to “OBS Virtual Camera”
- Click Save
- Launch OBS
- Click “Start Virtual Camera” in OBS
Click here to download OBS for free.
Advertising Your Event
In addition to any advertising provided by DJAWN, you have the option to advertise your live events on social media or any other platform.
You can always link directly to the DJAWN website using the standard www.djawn.com url. However, after planning an event, you can use your event’s url to link buyers directly to your event. This can be done by clicking on your event and then copying the url.
If you choose to use DJAWN logos or images, please contact support@djawn.com to ensure you follow our branding standards.
You can find official DJAWN branding here.
Payment Distribution
As mentioned above, DJAWN uses Stripe to process payments. Click here to learn when you can expect to receive payments in your account.